This blog post details Timothy's editing process for Moonlight Sonata, using screenshots of his, and was fully written by him.
To begin, I chose the timeline-based and non-linear video editing software application that is Adobe Premiere Pro CC 2020 as my primary choice of software for video editing. To begin, most of the files were transferred from the SD card used to my desktop to begin editing.
The files were then imported into Premiere Pro, I then filtered the shots and deleted all the shots from the media library that I thought wouldn't be useful in the overall edit. I then downloaded the audio file of Liszt - Liebestraum No. 3 (Love Dream) and imported it into the project. It was the first thing dragged into the timeline as it is the main driving factor of the movie and most of the shots revolved around it. The editing software made it easier to choose parts of the song to sync clips to as it has the marking feature which allows the user to mark a certain part in the timeline with a label.

Shown below is the overall timeline of the project.

SIGNIFICANT EDITING CHOICES AND METHODS
ASPECT RATIOS
One of the main editing features is the presence of adjustment layers to change the aspect ratio of the scene, this is seen throughout the entire movie.
This was created using adjustment layers and the crop effect in Premiere Pro.
 In the scene showing younger Hazel I edited the aspect ratio to be more narrow, this was done by using the crop feature by adding a number to the sides. I made the choice to add this effect as videos back in the day were commonly shot in this size. Whereas, adolescent Hazel was shown using a wider aspect ratio as this creates a more cinematic effect and makes the scene more dramatic.
TRANSITION (Match Cut - Book)
Another significant part of the movie was the transition from adolescent Hazel to present Hazel, this was shown using a transition where a book closes and opens.
At first, this section did not look smooth at all and was very noticeable for the audience as the way we shot both the shots, both the angle and the hand placement was very different. This made for a choppy and jarring transition, however, after further revision using simple framing keyframes, this allowed for a more organized and centered framing while it smoothly tracks the actor's movement. The existing motion blur also helped in making the transition smoother as we shot the video at a lower shutter speed.
In the scene showing younger Hazel I edited the aspect ratio to be more narrow, this was done by using the crop feature by adding a number to the sides. I made the choice to add this effect as videos back in the day were commonly shot in this size. Whereas, adolescent Hazel was shown using a wider aspect ratio as this creates a more cinematic effect and makes the scene more dramatic.
TRANSITION (Match Cut - Book)
Another significant part of the movie was the transition from adolescent Hazel to present Hazel, this was shown using a transition where a book closes and opens.
At first, this section did not look smooth at all and was very noticeable for the audience as the way we shot both the shots, both the angle and the hand placement was very different. This made for a choppy and jarring transition, however, after further revision using simple framing keyframes, this allowed for a more organized and centered framing while it smoothly tracks the actor's movement. The existing motion blur also helped in making the transition smoother as we shot the video at a lower shutter speed.
 Using these keyframes, I changed both the scaling and the positioning of the clips.
COLOUR GRADING
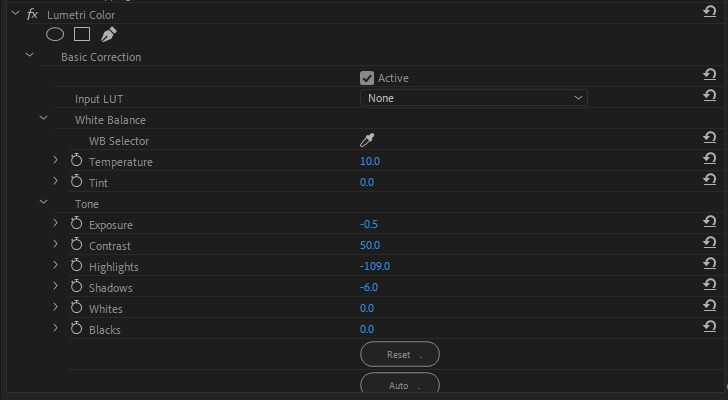
A subtle part of video editing that is most of the time overlooked is the colour grading of the final product. The whole movie was colour graded using the feature of Lumetri Color in Premiere Pro.
(this is an example of the settings I chose for the clip shown below)
RESULTS
Using these keyframes, I changed both the scaling and the positioning of the clips.
COLOUR GRADING
A subtle part of video editing that is most of the time overlooked is the colour grading of the final product. The whole movie was colour graded using the feature of Lumetri Color in Premiere Pro.
(this is an example of the settings I chose for the clip shown below)
RESULTSwithout lumetri color
with lumetri color
This simple colour grading made the shot more cinematic with warm colours and a more natural skin tone. The original shot was overexposed and created unrealistic lighting and colour for a school environment, without colour grading it could have been very unattractive and it may stand out from the rest of the shots.
TITLE SCREEN (Moonlight Sonata Glow)
The final editing choice made was by far the most simple, this choice was to add a glow effect to the title screen. This was done by syncing it with the musical cue of a note playing. This effect was done by adding a copied layer of the original text, adding a stroke effect, and giving the text a camera blur, this was accompanied by keyframing the scale to make the text seem to glow, this was to mimic the moonlight glow to further emphasize our movie title.
blur effects available on Premiere Pro
RESULT
(final video is animated)


No comments:
Post a Comment